
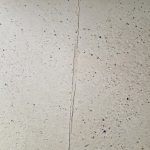
Movement Cracks After Microcement Installation (Boarded Floors)
Microcement is very strong, but it is dependent on the surface that it is being applied to for support.
If you’ve discovered straight line cracks in your boarded, microcement floor after the microcement has been installed, it’s most likely because there has been some movement between the boards below the microcement.
This guide tells you everything you need to know about why they might have appeared and what you can do to fix them.
How do Movement Cracks Form?
When floors crack in straight lines, it’s usually because there has been some movement in the sub-floor, below the microcement, that has caused the floor to crack.
Usually the floor cracks at weak points in the floor, which is usually along the joins between the boards.
How to Avoid Movement Cracks?
Correctly Prepare the Boarded Floor
Prevention is better than cure. We’d always recommend following the guide for preparing boarded floors before applying microcement.
This guide provides a detailed explanation of how to prepare boarded floors for microcement.
Use High Performance Primer
Because of all the joins between the boards, and the fact that they are generally used on suspended floors, there is an increased chance of movement on boarded floors. For this reason, we always recommend choosing High Performance Primer, which is available as a primer option in all our floor kits.
High Performance Primer adds strength, so will help to prevent movement transferring through to the microcement. This guide demonstrates how to install high performance primer.
How to Repair Movement Cracks After Microcement is Installed?
Unfortunately, there is no easy fix. If there is movement in the subfloor, which is causing the surface to crack, the only solution is to fix the movement.
Your builder or flooring contractor can help to advise the best way to strengthen the floor. It may be possible to strengthen it from underneath by adding noggins between the floor joists.
If the only option is to strengthen the floor from above, they may recommend screwing into it, or applying additional boarding onto of the floor.
Applying high performance primer will strengthen the floor too, the force it can withstand is the equivalent of around 2 tonnes per m2. If the forces acting on the floor are less than this, then it may be a good solution.
Once the repair is complete, try to live with it for some time to make sure the movement issues have been resolved. If you see further cracks occurring, it will need further strengthening.
Reapply / Repair the Microcement
Once the subfloor has been repaired so that there is no chance of any further movement, you can turn your attention to repairing the microcement.
The level of repair will depend on the amount of damage that has been done to it during the movement of the sub-floor & the level of the repair work to it.
If the microcement has been completely covered, or striped back, the full microcement system will need to be repeated across the whole area, back to the primer & mesh.
If the damage is more minimal, then this guide explains the best process for repairing microcement surfaces: https://relentlessmicrocement.com/training/repairs-to-microcement-surfaces/
Whilst we don’t recommend patching, and can almost guarantee it can’t be done seamlessly, we understand you may want to give it a go, so have written a guide explaining the best approach for minimising visibility of patch repairs: https://relentlessmicrocement.com/training/microcement-patch-repairs/
And here’s our guide to touching up the microcement in very small areas, like chips, and into corners: https://relentlessmicrocement.com/training/touching-up-microcement/