
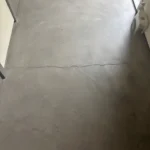
Movement Cracks After Microcement Installation (Screeds)
Microcement is very strong, but it is dependent on the surface that it is being applied to, for support.
If you’ve discovered straight line cracks in your screeded, microcement floor after the microcement has been installed, it’s most likely because there has been some movement in the screed below the microcement.
This guide tells you everything you need to know about why they have probably appeared and what you can do to fix them.
How do Movement Cracks Form?
When floors crack in straight lines, it’s usually because there has been some movement in the screed, below the microcement, that has caused the floor to crack.
Usually the floor cracks at weak points in the floor.
Weak points include cold joints, which are formed when screeds is poured in 2 or more separate pours. The line between 2 separate pours is called a cold joint. The cold joint is the point of least resistance, where any movement in the screed is most likely to present itself in the form of a crack.
Insufficient control joints in the screed may also result in uncontrolled cracks forming. This is most likely to happen between 2 weak points in the floor, usually from one corner, or door frame, to another.
How to Avoid Movement Cracks?
Sufficient Control Joints
Prevention is better than a cure. We’d always recommend talking to your screed installers before they start the pour.
Make sure they have installed sufficient control joints in the screed to avoid uncontrolled cracking.
You can take the opportunity to agree on locations that work best for your layout too.
Repair Cracks
Sometimes, movement & even cracks are unavoidable, but you want to try & make sure they appear and are dealt with before the microcement is installed.
Before you start the microcement installation, you need to be sure that the floor is fully cured, this means it should have a maximum moisture content of 5%.
If you have underfloor heating, this will need to be turned on & put through a full cycle too.
Any cracks that do form, can be repaired prior the microcement installation, see repairing cracks in concrete.
How to Repair Movement Cracks After Microcement is Installed?
If you do discover movement cracks after the microcement has been installed, there are a number of different ways that you can tackle it.
The more reliable & permanent solution would be to grind out a slim channel in a straight line along the length of the crack from wall to wall. You’ll need to grind down around 35mm (as long as there’s no risk of hitting underfloor heating pipes/ wires etc).
This will create a control joint, which will force any further movement into the weakened area & help to prevent cracks appearing elsewhere in the floor.
Fill the gap with a flexible material like silicone to allow for the movement, you can get colour matched silicone which is quite subtle. Use 100% silicone for good adhesion with the microcement.
What if I don’t want a Control Joint?
You can have a go at repairing the crack in the screed and then repairing the microcement.
Please be aware that it will be very difficult to seamlessly repair the microcement using this method as microcement is notoriously difficult to patch.
There will also still be a chance, if there is movement in the floor, that the crack could open up or more cracks could appear elsewhere in the floor.
Repair the Microcement
This guide explains the best process for repairing microcement surfaces: https://relentlessmicrocement.com/training/repairs-to-microcement-surfaces/
Whilst we don’t recommend patching, and can almost guarantee it can’t be done seamlessly, we understand you may want to give it a go, so have written a guide explaining the best approach for minimising visibility of patch repairs: https://relentlessmicrocement.com/training/microcement-patch-repairs/
And here’s our guide to touching up the microcement in very small areas, like chips, and into corners: https://relentlessmicrocement.com/training/touching-up-microcement/